How To Assemble The Brace Mechanical Tubing Punch
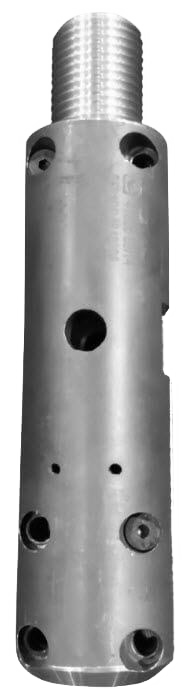
I’m Clint Bowers of Brace Tool and today I’m going to show you how to assemble and disassemble a 2-7/8 Mechanical Tubing Punch. A Mechanical Tubing Punch consists of main body which has a slip on the back side that links into the inside of the tubing wall when the punch is activated.
A sliding rod that the punch slides in and is pushed through the tubing. And a positioning rod which keeps the punch in position. A bushing that the punch runs through to keep the punch aligned straight. The punch itself. A bottom sub. Retainer pin. A button and spring. And some shear pins.
So we’ll take the main body and we’ll place it in the vice. On the back side of the body you’ll see there’s two holes here. These are the holes that the button will lock into when you either decide to not perforate and shear the tool [00:01:00 – inaudible] position locking and in safety position, or, in the upward positon after the punch has been activated to punch through the tubing hole.
So we take our punch and we install in into the sliding rod. The punch has to go in in the proper direction. It goes underneath and then slides into the groove. And as it slides you want to watch and make sure that the punch is staying in the flat position, nice and straight. If it’s in incorrectly or upside down, the punch will be cocked off to an angle and it will not slide through the bushing correctly so assembly will be nearly impossible. Install all that in the correct position, set it there.
We’ll take our positioning rod, we’ll install our bushing. The bushing is an expendable piece that will wear out with time. Some people recommend you replace it every run. I would replace it as needed. We’ll tap it in with a brass hammer. Make sure it’s in nice and snug and fairly flush there. Then that gets installed over the top of the punch and all aligns into the rod.
And the back side of the sliding rod, you’ll see this recess here, that’s where the button and the spring will go. And so we’ll take this and we’ll install it into the main body. I’ll set it just like that so the button and spring can be installed. Take a button and spring and we’ll put it into here. And you can see the hole where it locks there.
So we press it in with our thumb, slide it in past there. You want to slide it past that hole before you turn it to this position or it will lock and you’ll have to unlock it. When you slide it into here we’ll press it down and I’ll put it into the locked position where it would be if you decided that you weren’t going to do the perforating after running in the hole and needed to retrieve the tool.
So we push it down and you’ll hear it click into place. There’s the button. To retract the button I use a punch. Just press it in and pull upwards. That way we’re not pinching my fingers with it. And then with your other hand you can push the sliding rod up to align your shear pin hole with the sliding rod in the main body. Check that with a punch to make sure everything’s aligned. Install your shear pin. That’ll make it so the tool can’t travel down and lock into the closed position any further along. So that can be pushed down.
We’ll turn this up so we can see the hole where the set screw’s going to go through and install our retainer pin. The retainer pin itself has a recess in the center where the set screw goes so it doesn’t slide out. Install our set screw. Bring it up. Store your bottom sub.
And at this point you would tighten that up for running in the well so you know that it’s good to go and wont’ fall out. Then at the top end we have a shear pin hole on either side that keeps your tool in the closed position until you get to where you’re going and you shear the tool. So we’ll install just one of these shear pins for now.
So I push the pin in and I just slowly slide the fish neck up until the pin aligns. Then I give it a couple of hits with a hammer to flare it out a bit so it doesn’t come over. You could center punch it. I’ve left this pin a little long just so I can do the function test easily here.
So everything’s sitting smooth. You’d run this in to the top of the collar stop or the slip stop in the well to your desired depth. When you get there, set down on it, close your [00:05:22 – inaudible], pick up slightly, give a jar down to shear thispin which will allow that to shear, moves about a quarter of an inch. You don’t want to jar excessively on that because now you’re jarring against that shear pin down there. That shear is to allow you to lock it. It’s brass pins so it takes one or two hits to shoot up here.
Once that’s sheared, you pull up on your tool string and your punch will start to come out of your positioning rod. And it’ll push the punch against the tubing wall and the slips against the tubing wall, locking it in place. And then you’ll begin to jar up. So you’ll jar up and it’ll start forcing the punch into the tubing. You don’t want to jar down after this. Set down lightly and jar up. Jar up, jar up. About a dozen hits to punch J55 tubing or LED tubing. So you jar up until you’ve punched through the tubing wall.
The punch continues to travel out. And once it’s made it to the peak of the ramp inside your sliding rod it starts to taper back down the other side and pull it back in. And then it’ll close and you’ll hear the button lock into place. Then you retrieve the tool from the well.
Once you’re out of the well, to service the tool, you do it, pretty much, in the reverse order. We disassemble it. We take our set screw out. Take our retainer pin out. Remove our shear pin. We have to unlock the button which will allow the assembly to slide out.
And then, again, we want to pull this up. And we don’t want the button and spring to fall out so I turn it sideways again like I did when I installed it and hold my hand over the edge and slide everything up, and allow the button and spring to fall into my hand. I remove the punch, inspect it for damage, make sure there’s no cracks or anything.
Take a pin punch, draw it through your bushing. Tap down on it. Remove your bushing, check it for cracks or damage. Take all your parts apart, inspect them for damage. If everything’s good you can reassemble the tool and use it again. If anything’s damaged, replace it with the new parts that’s needed. Thank you.
See More
See Less
Sales & Support